Set up WooCommerce
Use this guide to set up your WooCommerce store in Connector. The screenshots use example information. The Connector screens shown are in Portuguese, and your WooCommerce admin may use another language.
Before you start
- Have administrator access to WooCommerce and access to your Connector operation.
- Confirm that the store address starts with https:// and opens normally on the internet.
- Decide the store's role. The central store supplies the reference catalog and receives orders from other channels. A secondary store receives catalog and stock from the central store and sends its own orders to Connector. Two WooCommerce stores can have these different roles in one operation.
- Prepare a test product and order. Check how your store's order statuses affect stock before processing live sales.
1. Create a WooCommerce access key
In WordPress, open WooCommerce → Settings → Advanced → REST API and select Add key. REST API is the name of this menu in WooCommerce. Give the key a recognizable description, select an authorized user, and choose Read/Write. Generate the key and keep both displayed values, Consumer Key and Consumer Secret, secure. The second value may no longer be shown after you leave the page.

Do not include the key in screenshots, support tickets, or messages.
2. Add and verify the connection
In Connector, open Connections → New connection, enter a recognizable name, and choose WooCommerce. Enter the public HTTPS store URL, Consumer Key, and Consumer Secret. Select Add and verify. Connector checks access before showing the connection as valid.
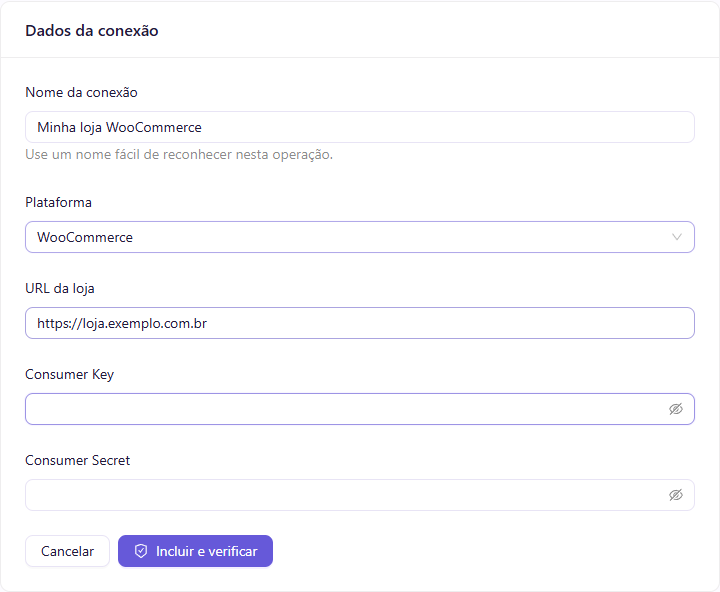
If verification rejects the key, check the store URL, the user associated with the key, and its Read/Write permission. When rotating a key later, update the connection credentials; Connector verifies them again.
3. Choose the role and map order statuses
Open Manage on the verified connection and designate it as the central system or a secondary store. Map WooCommerce order statuses to Connector statuses before processing orders. For two WooCommerce stores, create separate connections and assign one role to each.
Connector can create channel orders in the central store. It does not mark those orders as paid. A secondary store sends its own orders to the operation. Cancellations and other status changes follow the configured mappings. Place a test order and check its status and stock effect in both stores.
4. Turn on product and order notifications
On the Connector connection page, select Show address and key. Copy the delivery address and signing key. This shows the existing key; it does not generate a new one. Keep it secure.
In WooCommerce, open WooCommerce → Settings → Advanced → Webhooks → Add webhook. “Webhook” is WooCommerce's name for an automatic notification. Create five active notifications: product created, product updated, product deleted, order created, and order updated. For each, select the matching topic and use the same delivery address and same signing key provided by Connector for this connection. Save each notification.
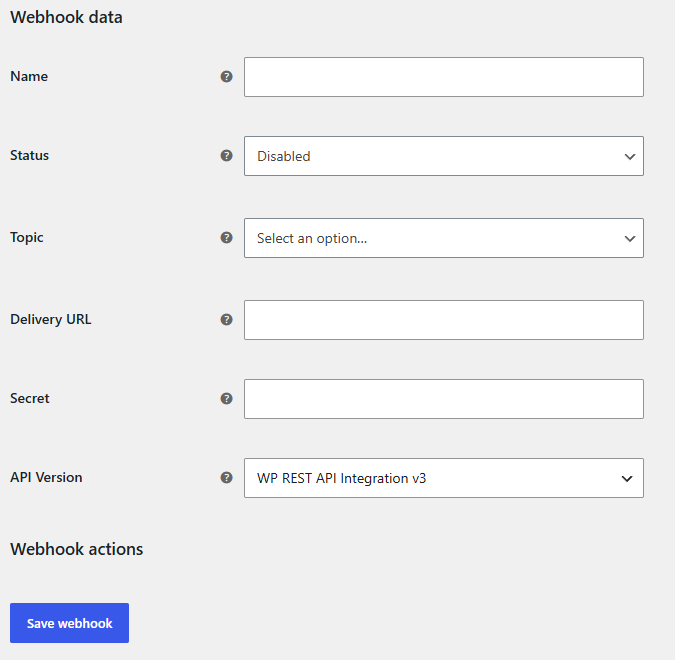
If a notification needs attention, open Manage → View pending notifications on the connection. Check the address and key entered in WooCommerce before requesting another attempt.
5. Choose how stock is distributed
In Connector, open Settings → Stock management. Leave Track inventory from the central store enabled if the central store provides quantities. With this setting enabled, a product with no numeric quantity is treated as having zero stock.
If the operation does not track central quantities, turn the setting off and save a Quantity sent for each secondary connection, such as 10 for one and 100 for another. Only active products available for sale receive that quantity. Unavailable products or variations, and connections without a configured quantity, receive zero. This setting does not change prices.
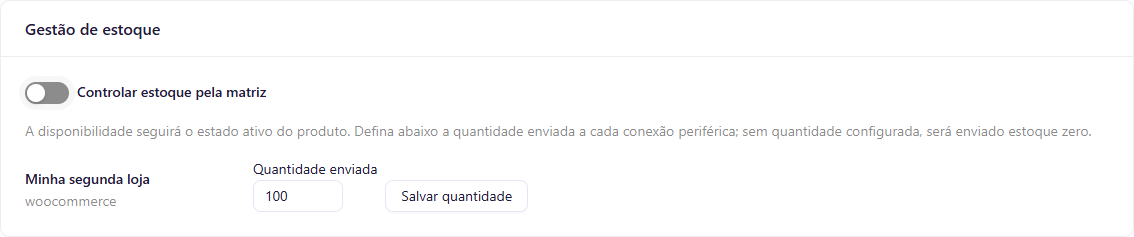
This setting applies to the operation in Connector. It differs from Manage stock on an individual WooCommerce product. If a product has no quantity and Track inventory from the central store remains on, channels receive zero stock for that product.
6. Install the plugin only if the central store receives taxed orders
When WooCommerce is the central store and will receive orders with tax, install the Connector WooCommerce plugin. In WordPress, open Plugins → Add Plugin → Upload Plugin, select the downloaded file, install it, and activate it. The plugin preserves the total tax and order amount received from other channels.
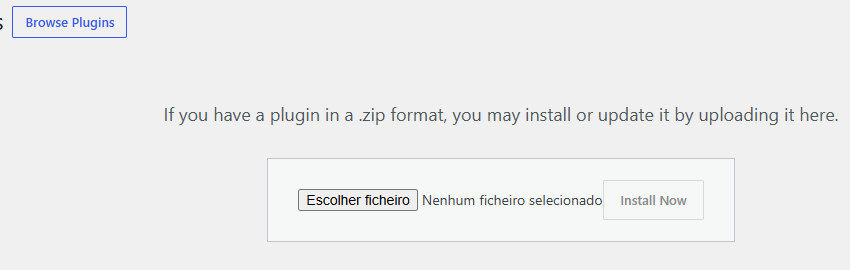
Secondary stores and central stores receiving only orders without tax do not need the plugin. Even with the plugin installed, set up the five notifications in step 4.
7. Verify the flow before operating
- Create or update a simple test product in the central store. Confirm its import into Connector and publication in the secondary store with the same price and expected stock.
- If you sell variations, update one and verify its product code (SKU), price, availability, and stock in the secondary store.
- Place a test order in the secondary store, including shipping or a discount if used in your operation. Verify that it appears in Connector and exactly once in the central store, without Connector marking it as paid.
- Cancel the order and verify its status and stock in both stores. For taxed orders, activate the plugin first and check tax and total.
- Review pending notifications and resolve failures before starting live operations.
If Connector cannot confirm that an order was created in the central store, search the store before confirming that the order does not exist. Connector waits for this check to avoid a duplicate order. If you cannot find it, follow the action shown in the panel.